...I'm just visiting. Geeze I've been gone for so long I forgot how to compose a post. I recently did a haul and decided to do a wear test on CDN's Vinylux.
Friday, September 19, 2014
Sunday, December 1, 2013
Splish Splash...
Your files need a bath.
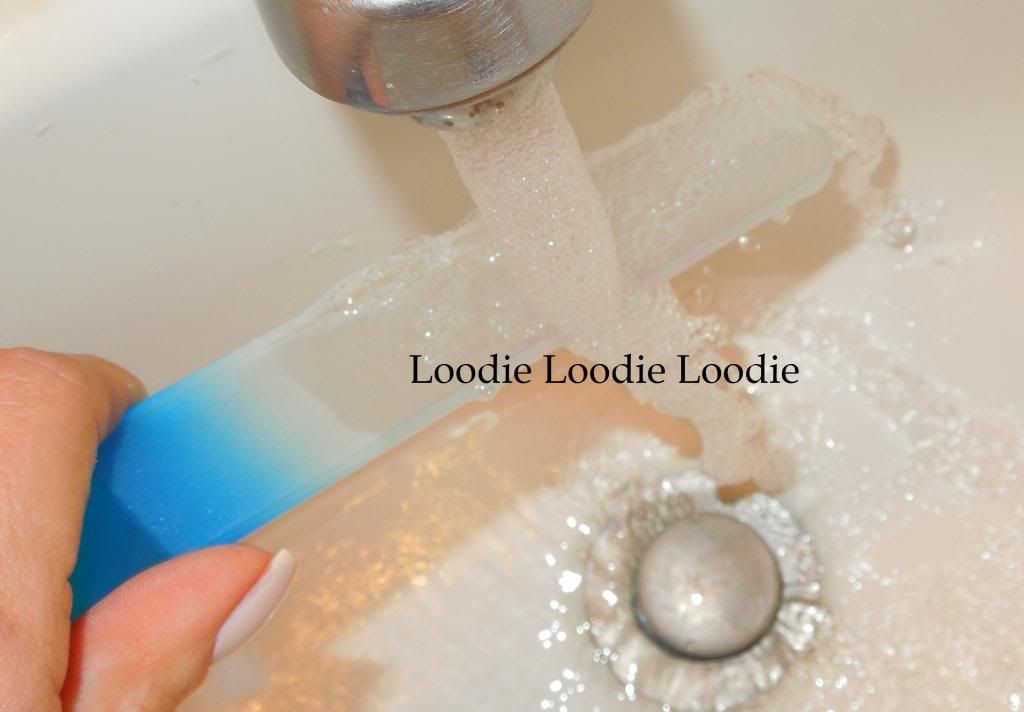
Have you notice your crystal nail file is not filing like it used to? Or what if it starts to look like this:
...then, it's time to give them a little tender love and care. It's pretty easy to get a file into a "like new" state.
Step 1: Moisten the nail file.
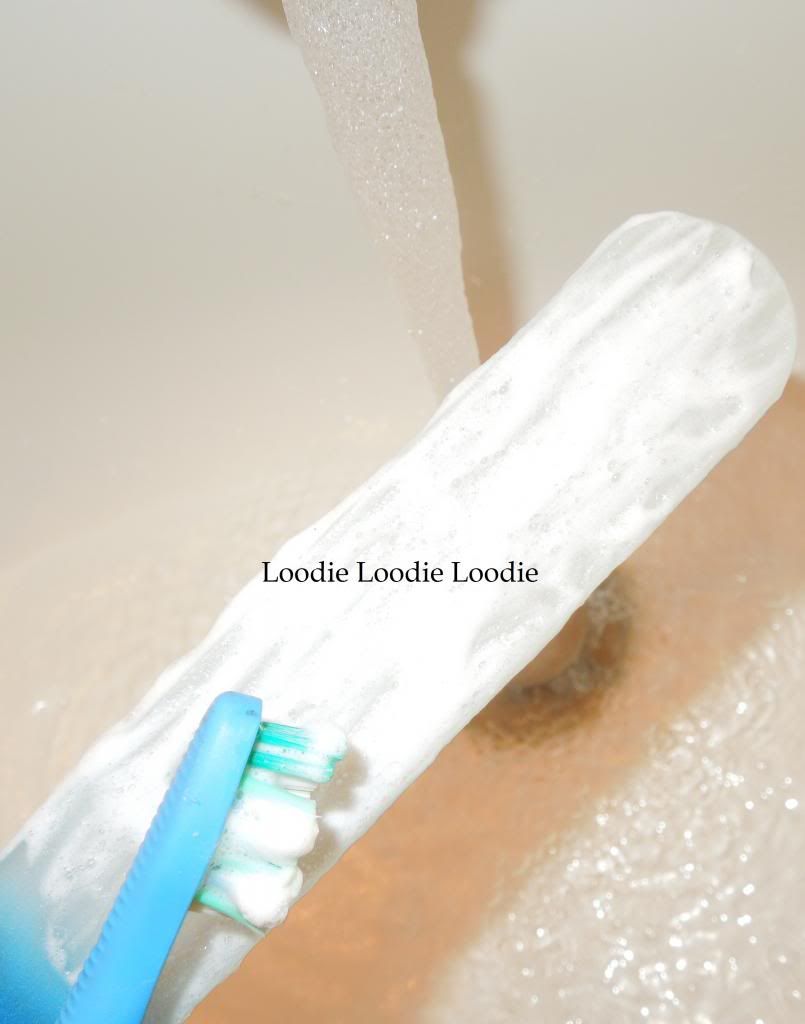
Step 2: Dip an old toothbrush in some soap and lather up your file.
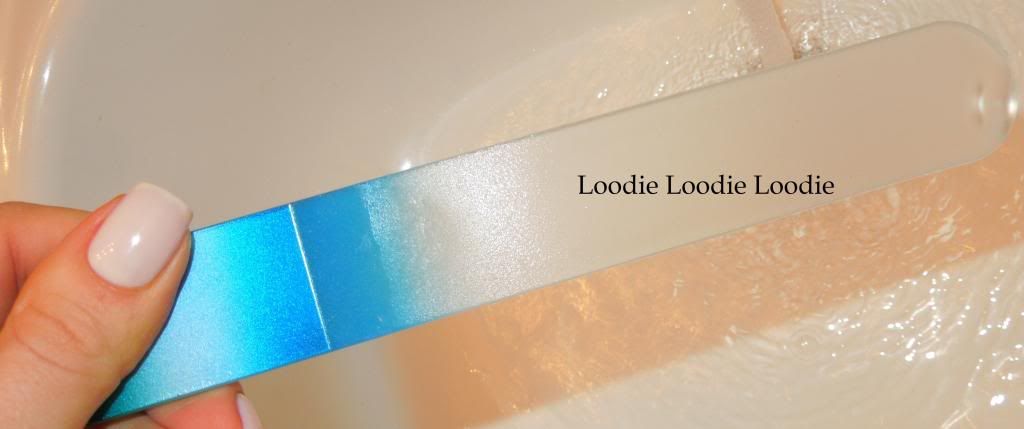
Step 3: Rinse.
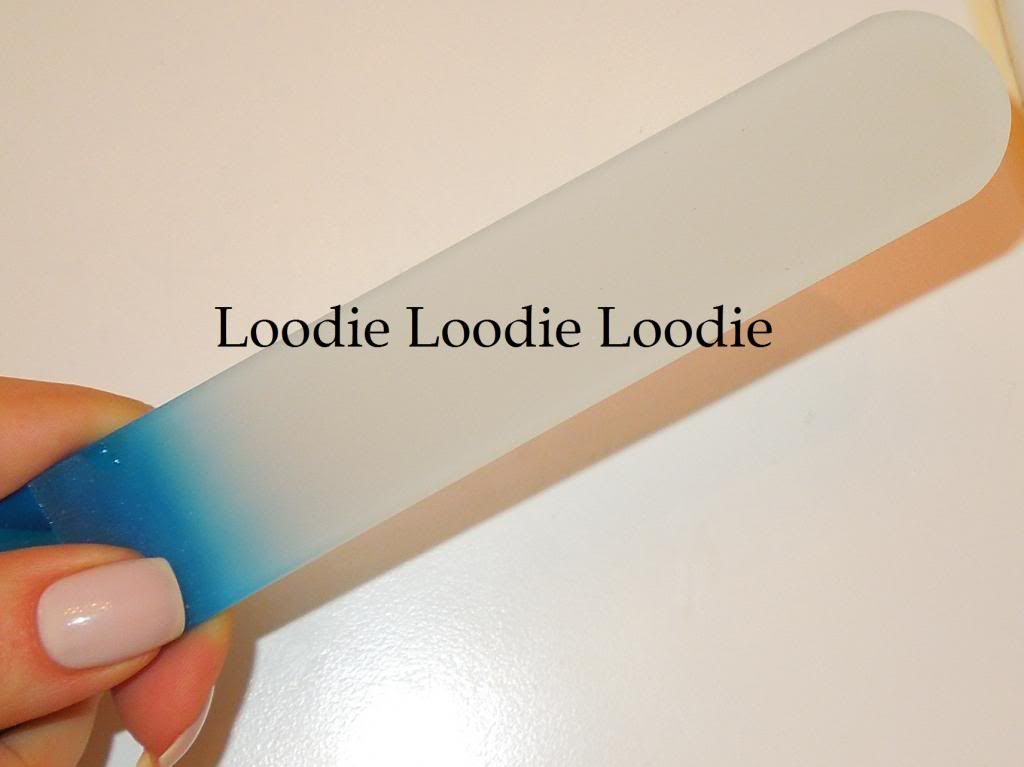
Step 4: Admire your handy work.
Step 5: Pat dry with a towel OR pat file with a cotton ball soaked with acetone to completely remove colored polish residue embedded in the nail file.
Did I just make a really simple procedure long and drawn out? I'm a visual learner, so sue me. Follow these steps and your nail file will be rejuvenated and your nails will file/feel better!
Note: If your nail file does not file very well even after this procedure, it is possible it is of lower quality and standard, i.e. made in China. To make sure it is of the highest quality, make sure it is made in the Czech Republic. Click here for a related post on crystal nail files.
Have you notice your crystal nail file is not filing like it used to? Or what if it starts to look like this:
 |
| Czech crystal nail file |
...then, it's time to give them a little tender love and care. It's pretty easy to get a file into a "like new" state.
Step 1: Moisten the nail file.
 |
| Get wet. |
Step 2: Dip an old toothbrush in some soap and lather up your file.
 |
| Lather |
 |
| Rinse |
Step 4: Admire your handy work.
 |
| Beauuutiful! |
 |
| Ta da! |
Note: If your nail file does not file very well even after this procedure, it is possible it is of lower quality and standard, i.e. made in China. To make sure it is of the highest quality, make sure it is made in the Czech Republic. Click here for a related post on crystal nail files.
Saturday, November 16, 2013
Winter is coming
This is a public service announcement. Depending on your area of domicile, you may experience extreme bouts of blustery cold whether. In such cases, exercise extreme caution. Your nails and cuticles are in dire straits without proper protection. Make every effort to moisturize your nails and cuticles 2-3 times a day, everyday, and wear gloves when bearing the elements.
What am I using at the moment?
I caved and bought CND's Solar Oil about a year ago. I always hesitated to make the purchase because of the price. I have SO many moisturizers; do I really *need* one for $16/oz? No, but I finally bit the bullet for curiosities sake. It's nice and light. Many oils tend to be heavy and greasy, but this one absorbs very quickly. Also, I really enjoy the sent and you will too if you like the smell of almonds.
I picked up Nail Tek's Renew oil a couple of years ago and yes I bought a HUGE bottle (4oz). Guess how much I've used? I barely put a dent in it. I like it. It's a good reliable nail and cuticle oil. It is heavier (more greasy) than CND's Solar oil and needs a lot more time to absorb.
**Note to self... stop being so eager, 4oz is a bit much. I might need to start moisturizing more than my cuticles.
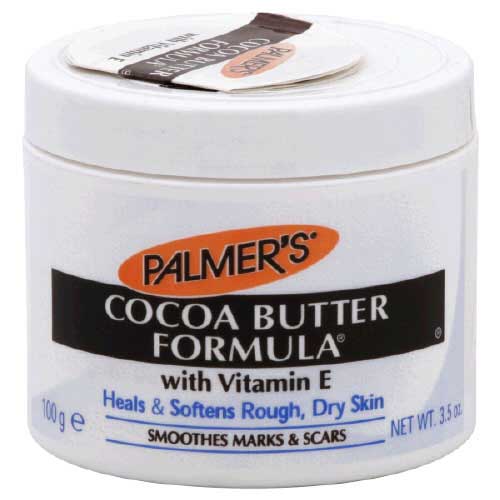
Palmer's Cocoa Butter Formula is still in heavy rotation. I talked about it before in this post and this video.
Cutemol is in even heavier rotation. This has got to be one of my favorite products for winter time. A little will go a long way. Like I've mentioned before in this post, it has a funny smell but does a fantastic job as a moisturizer and skin and cuticle protector. Rough and ragged skin is transformed pretty quickly too. I am always amazed what 2-3 days of consistent use does for my cuticles.
I mentioned this before, but I want to do a thorough break down and review of Cutemol. I will try to work on this post for the future.
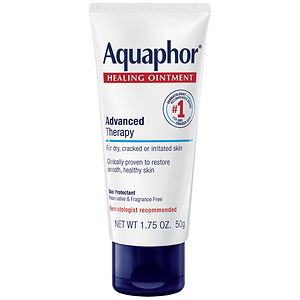 Aquaphor too, like Cutemol, is a life saver. Since this ointment is on the heavy side, I use smaller amounts and it behaves nicely.
Clearly I think moisturizing is important. Click here for more relevant posts on the topic.
P.S. I am excited for Game of Thrones to start back up in a few long months!
What am I using at the moment?
 |
| Image Credit |
I caved and bought CND's Solar Oil about a year ago. I always hesitated to make the purchase because of the price. I have SO many moisturizers; do I really *need* one for $16/oz? No, but I finally bit the bullet for curiosities sake. It's nice and light. Many oils tend to be heavy and greasy, but this one absorbs very quickly. Also, I really enjoy the sent and you will too if you like the smell of almonds.
 |
| Image Credit |
I picked up Nail Tek's Renew oil a couple of years ago and yes I bought a HUGE bottle (4oz). Guess how much I've used? I barely put a dent in it. I like it. It's a good reliable nail and cuticle oil. It is heavier (more greasy) than CND's Solar oil and needs a lot more time to absorb.
**Note to self... stop being so eager, 4oz is a bit much. I might need to start moisturizing more than my cuticles.
 | |
| Image Credit |
 | |
| Image Credit |
I mentioned this before, but I want to do a thorough break down and review of Cutemol. I will try to work on this post for the future.
Clearly I think moisturizing is important. Click here for more relevant posts on the topic.
So, remember.... Winter is coming
 |
| Moisturize... I'm watching you. |
P.S. I am excited for Game of Thrones to start back up in a few long months!
Saturday, November 9, 2013
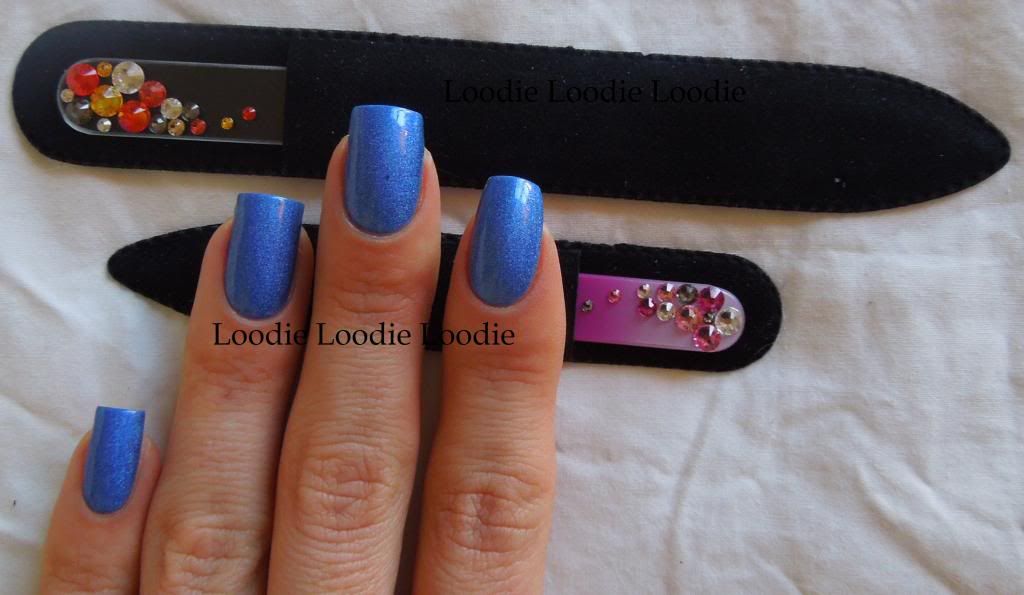
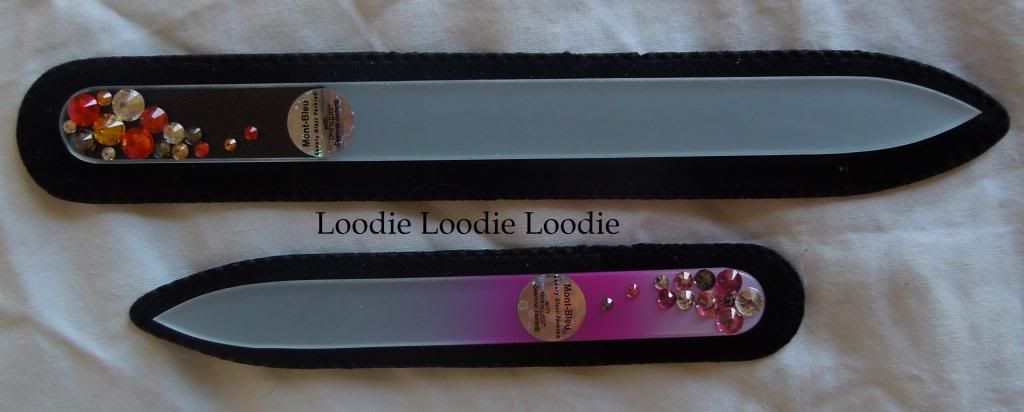
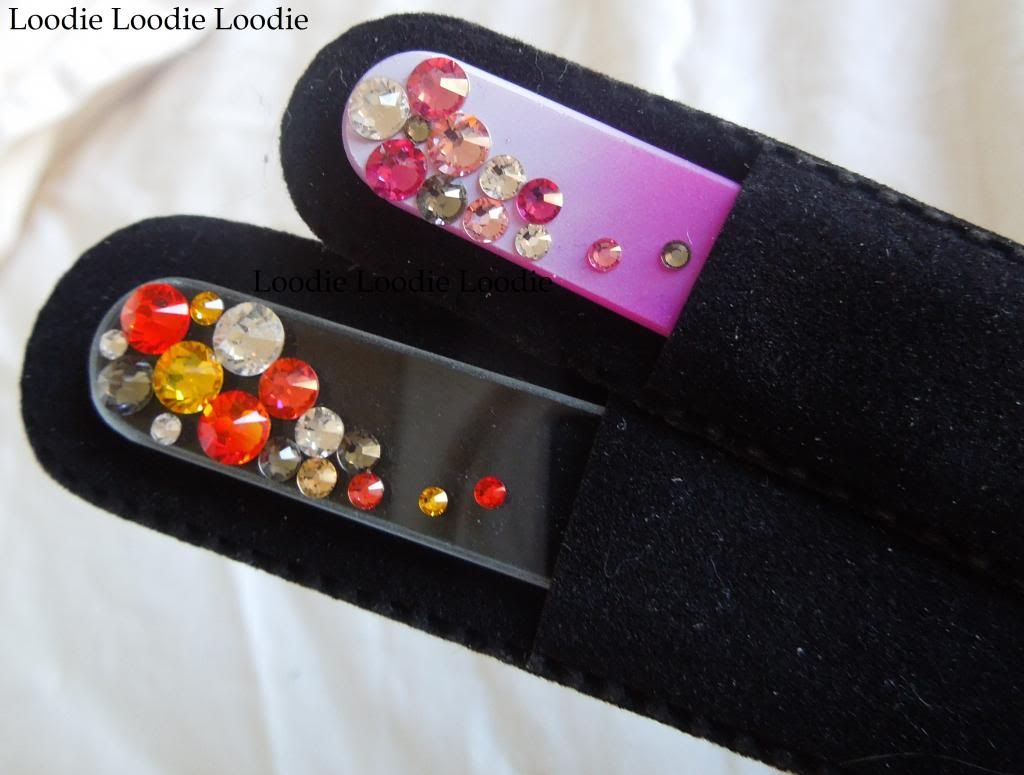
Can we love on crystal nail files?
I own several crystal nail files, some are good, some are atrocious. Most, if not all, of the terribly made crystal nail files are made in China; the best come from the Czech Republic. One terrific option is made by Mont Bleu.
Here are two size options:
The top file is your typical standard size and the lower one is a mini file. I know they make a larger one, which I did not receive to show, but I own several and they look something like this:
These big boys are great for sanding the feet area.
These two particular files are embellished with Swarovski crystals. The crystals are nice, but I was more concerned with whether the files are able to perform the job.
Durability
In terms of durability, my cardboard files are pretty heavy duty and I find myself throwing them around haphazardly. Of the crystal glass files I own, I never worry either. I have bought several Nail Tek glass files and each came in a protective, tight fitting, plastic case, while my OPI crystal file came in a plastic tube. Unfortunately, I had to be somewhat cognizant of the Mont Bleu files because they came tucked in a simple soft felt protector. Thus initially, I did not reach for them often. I guess it was too much trouble to worry about them. To give them a fair review, I decided I had to place them in a safe yet easily accessible place. I put one file in a desk drawer I frequent several times a day and the smaller one in a random purse unprotected. I must mention that this company carries a line of files that includes a protective case, it just wasn't the one I received.
Performance
After over a year of use, I can honestly say the Mont Bleu files are of very high quality. They rival the other decent files I own made by OPI, Nail Tek and non-branded files from the Czech Republic. I was thoroughly impressed with not only the performance I experienced, but by the crash test shown in this video:
The file is particularly impressive on the hard tile (at 0:54). Now I wouldn't go throwing my good files at hard surfaces, but I enjoyed the video none the less.
Intent
I mainly used these Mont Bleu files to finish or touch up my nail shape, just like I would with the 400/600 grit Tropical Shine files. I still prefer a lower grit strength (like 220/320 by Tropical Shine) for taking down nail length, but it would do well for people with patience or people with nails that are weak, thin or problematic.
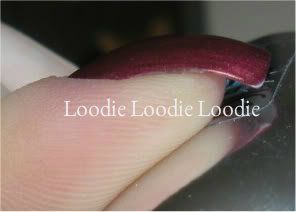
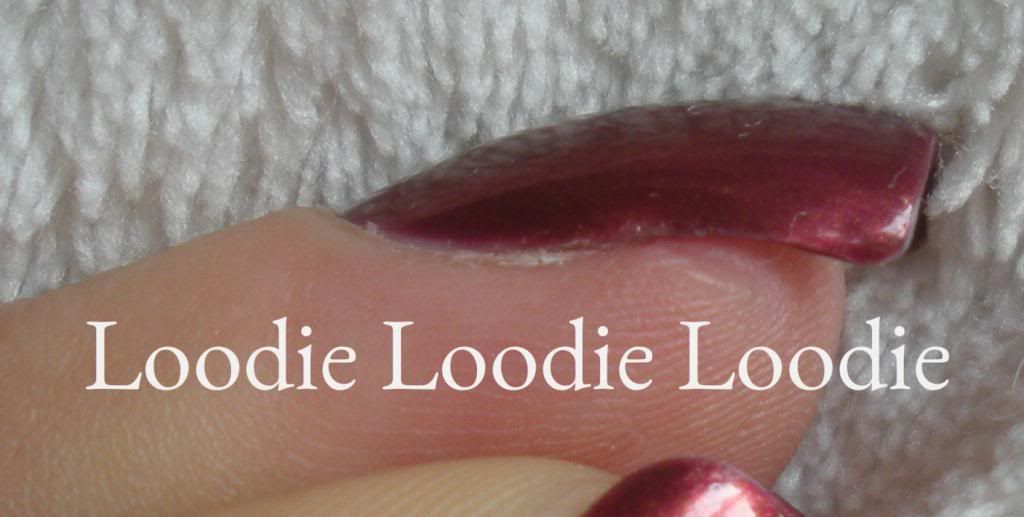
How about an example of how I used, and will continue to use, these and my other crystal files? Let's say you are going for a square shape. Over the course of a week, the nail corners can get a bit rounded. This can be remedied by filing straight across until your desired shape is achieved. Sometimes this type of filing can create "nail shavings". What's that you say? See picture below:
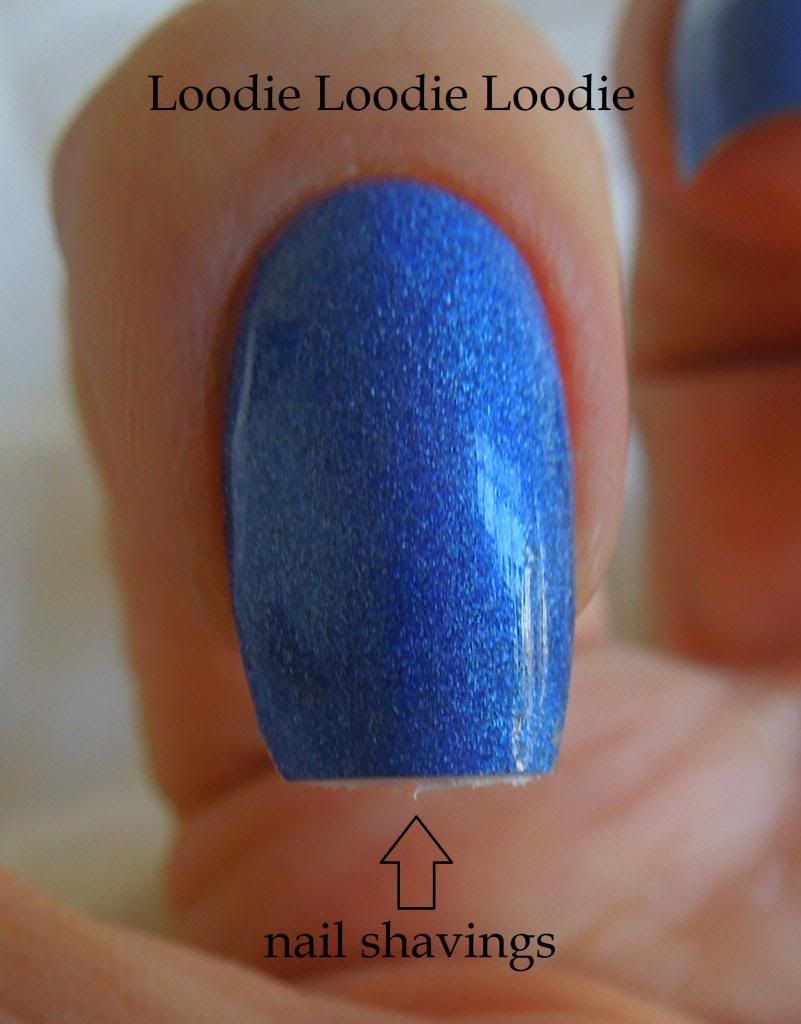
The nail shavings can then be eliminated by dragging your nail down the length of the file. This is the exact same technique I showed in previous posts/videos.

Please don't be alarmed by my excessive nail meat. I can't help it.
Longevity
I am repeating myself here, but these files are on par with my other high quality crystal nail files. They have continued to stay sharp, requiring only an occasional washing. I posted on that topic here!
In Summary
The take home message is, if you are in the market for a glass nail file, I recommend you demand they be made in the Czech Republic. However, I can not guarantee this wont happen...
Life lesson: Don't leave a glass nail file to hang out on the carpet, while you go get a bowl of ice cream. Your heel will be sure to make direct contact sooner rather than later.
If you are interested in Mont Bleu specific nail files, their website is: www.design-glassware.com They have many options that may suit your needs.
*Mont Bleu files sent for review*
Here are two size options:
 |
| Mont Bleu Crystal Nail Files |
|
| No Name Brand Czech Crystal Nail File |
 |
| Mont Bleu Crystal Nail Files |
Durability
In terms of durability, my cardboard files are pretty heavy duty and I find myself throwing them around haphazardly. Of the crystal glass files I own, I never worry either. I have bought several Nail Tek glass files and each came in a protective, tight fitting, plastic case, while my OPI crystal file came in a plastic tube. Unfortunately, I had to be somewhat cognizant of the Mont Bleu files because they came tucked in a simple soft felt protector. Thus initially, I did not reach for them often. I guess it was too much trouble to worry about them. To give them a fair review, I decided I had to place them in a safe yet easily accessible place. I put one file in a desk drawer I frequent several times a day and the smaller one in a random purse unprotected. I must mention that this company carries a line of files that includes a protective case, it just wasn't the one I received.
Performance
After over a year of use, I can honestly say the Mont Bleu files are of very high quality. They rival the other decent files I own made by OPI, Nail Tek and non-branded files from the Czech Republic. I was thoroughly impressed with not only the performance I experienced, but by the crash test shown in this video:
The file is particularly impressive on the hard tile (at 0:54). Now I wouldn't go throwing my good files at hard surfaces, but I enjoyed the video none the less.
Intent
I mainly used these Mont Bleu files to finish or touch up my nail shape, just like I would with the 400/600 grit Tropical Shine files. I still prefer a lower grit strength (like 220/320 by Tropical Shine) for taking down nail length, but it would do well for people with patience or people with nails that are weak, thin or problematic.
 |
| Mont Bleu Crystal Nail Files |
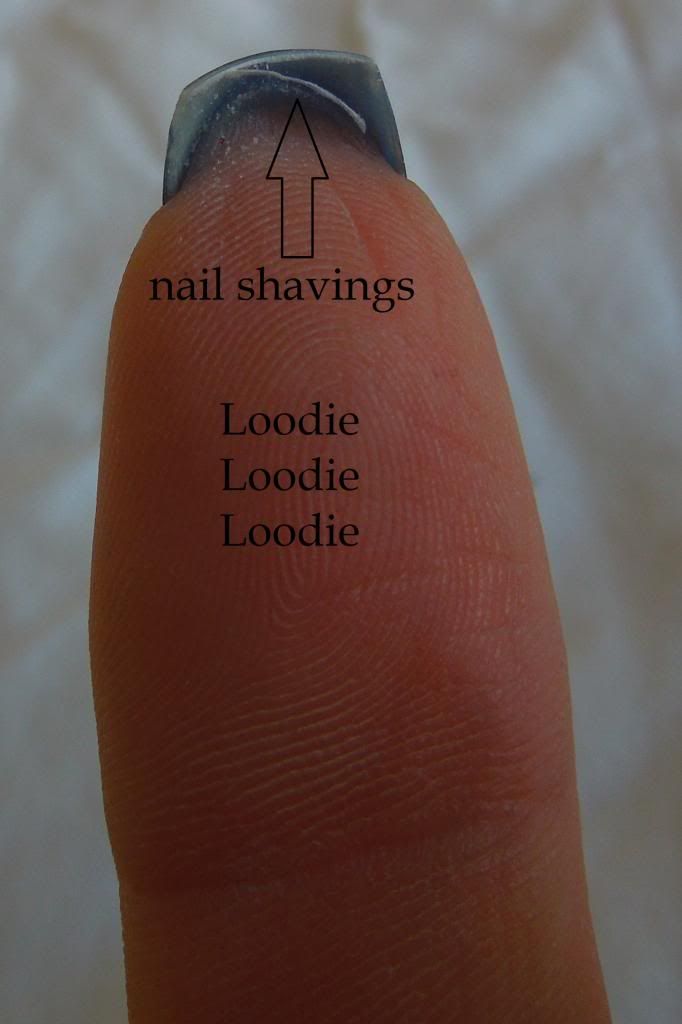 |
| Loodie nail shavings |
 |
| nail shavings |
The nail shavings can then be eliminated by dragging your nail down the length of the file. This is the exact same technique I showed in previous posts/videos.
 |
| Nail shavings eliminated! Nail sealed! |
Longevity
I am repeating myself here, but these files are on par with my other high quality crystal nail files. They have continued to stay sharp, requiring only an occasional washing. I posted on that topic here!
The take home message is, if you are in the market for a glass nail file, I recommend you demand they be made in the Czech Republic. However, I can not guarantee this wont happen...
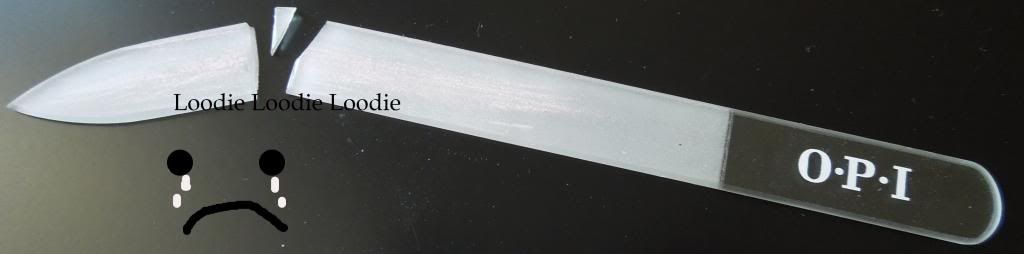 |
| OPI Crystal Nail File Sadness |
If you are interested in Mont Bleu specific nail files, their website is: www.design-glassware.com They have many options that may suit your needs.
*Mont Bleu files sent for review*
Friday, November 1, 2013
Oh hi
Things in life that are easier than finding a job:
1. Achieving the perfect squoval.
2. Keeping a wonky nail at bay.
3. Properly using neeeeepers.
It hasn't been easy, but it finally happened; I am employed! Let's all moisturize our cuticles to celebrate.
I'll tell you what, rejection is tough. Thank goodness nail care and polish so easily amuse me and make me happy.
Today I am wearing ...
I wish China Glaze made a polish like this in every color.
1. Achieving the perfect squoval.
2. Keeping a wonky nail at bay.
3. Properly using neeeeepers.
It hasn't been easy, but it finally happened; I am employed! Let's all moisturize our cuticles to celebrate.
I'll tell you what, rejection is tough. Thank goodness nail care and polish so easily amuse me and make me happy.
Today I am wearing ...
 |
| China Glaze - Dorothy Who? |
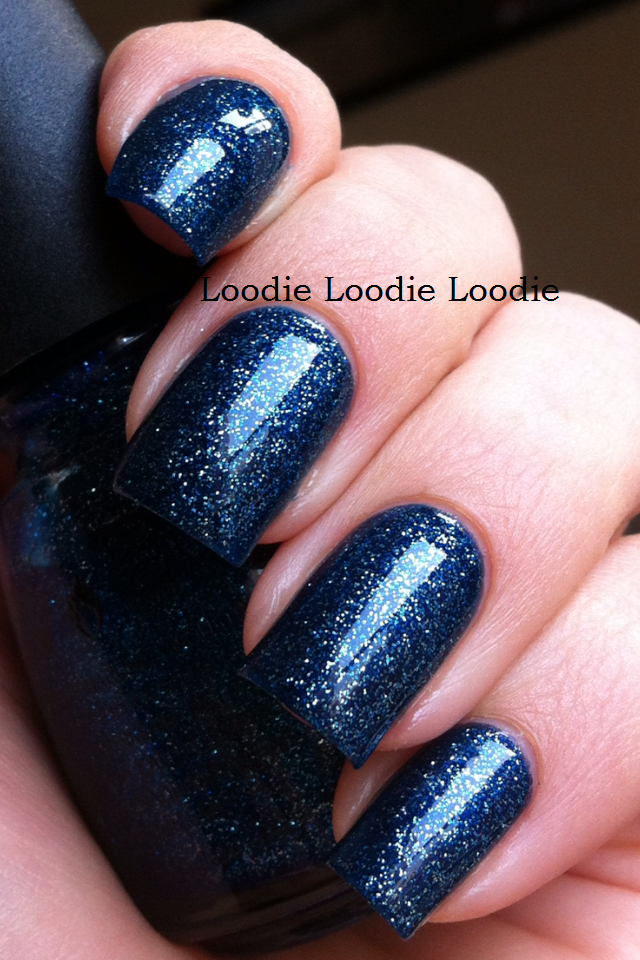 |
| China Glaze - Dorothy Who? |
Tuesday, April 2, 2013
Finally official... Dr. Loodie
A big chapter of my life has come to a close. I've been in school for a pretty long time and finally it's all done. I hesitated to post this yesterday for obvious reasons.
I wore Revlon - Royal during my dissertation defense. It didn't go unnoticed. A few members of my committee went for a drink afterwords and they brought it up. Unfortunately I did not take pictures of the manicure, however here is Revlon - Royal from an older post. This older picture is without top coat. My defense manicure was definitely shiny.
So that's my "big thing". I'm happy. Now I have to find a job. Oye!
P.S. If you're interested in what I studied, I touch on it a bit in this post. See #10
I wore Revlon - Royal during my dissertation defense. It didn't go unnoticed. A few members of my committee went for a drink afterwords and they brought it up. Unfortunately I did not take pictures of the manicure, however here is Revlon - Royal from an older post. This older picture is without top coat. My defense manicure was definitely shiny.
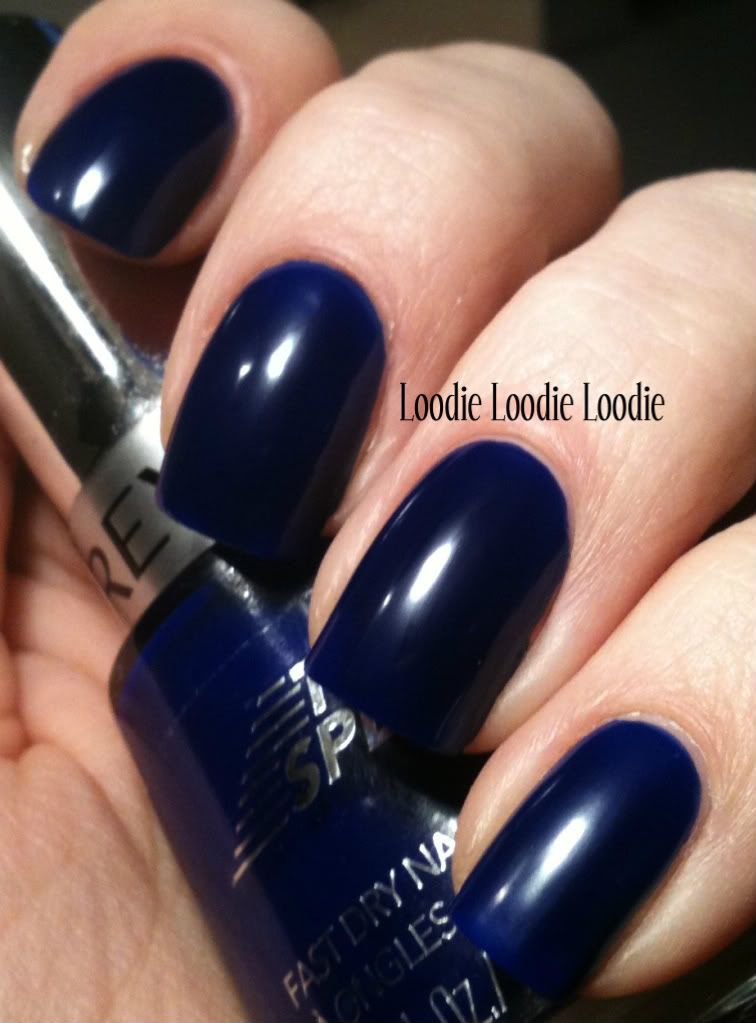 |
| Revlon - Royal |
P.S. If you're interested in what I studied, I touch on it a bit in this post. See #10
Saturday, February 2, 2013
Things, big and small
Hello LOODIE! ... Click on that for a background story so you don't think I am just shouting my blog name randomly.
I am working on some things, BIG things. It will continue to be cricket noises around here as I don't see how it will be possible to post very much until after April 1. No worries! It all has to do with big positive things in life! :D
Now on to the small things in life that bring me joy....
Here are a few manicures I've worn since I've gone MIA:
GO RAVENS ...
See you in April! <3
I am working on some things, BIG things. It will continue to be cricket noises around here as I don't see how it will be possible to post very much until after April 1. No worries! It all has to do with big positive things in life! :D
Now on to the small things in life that bring me joy....
Here are a few manicures I've worn since I've gone MIA:
GO RAVENS ...
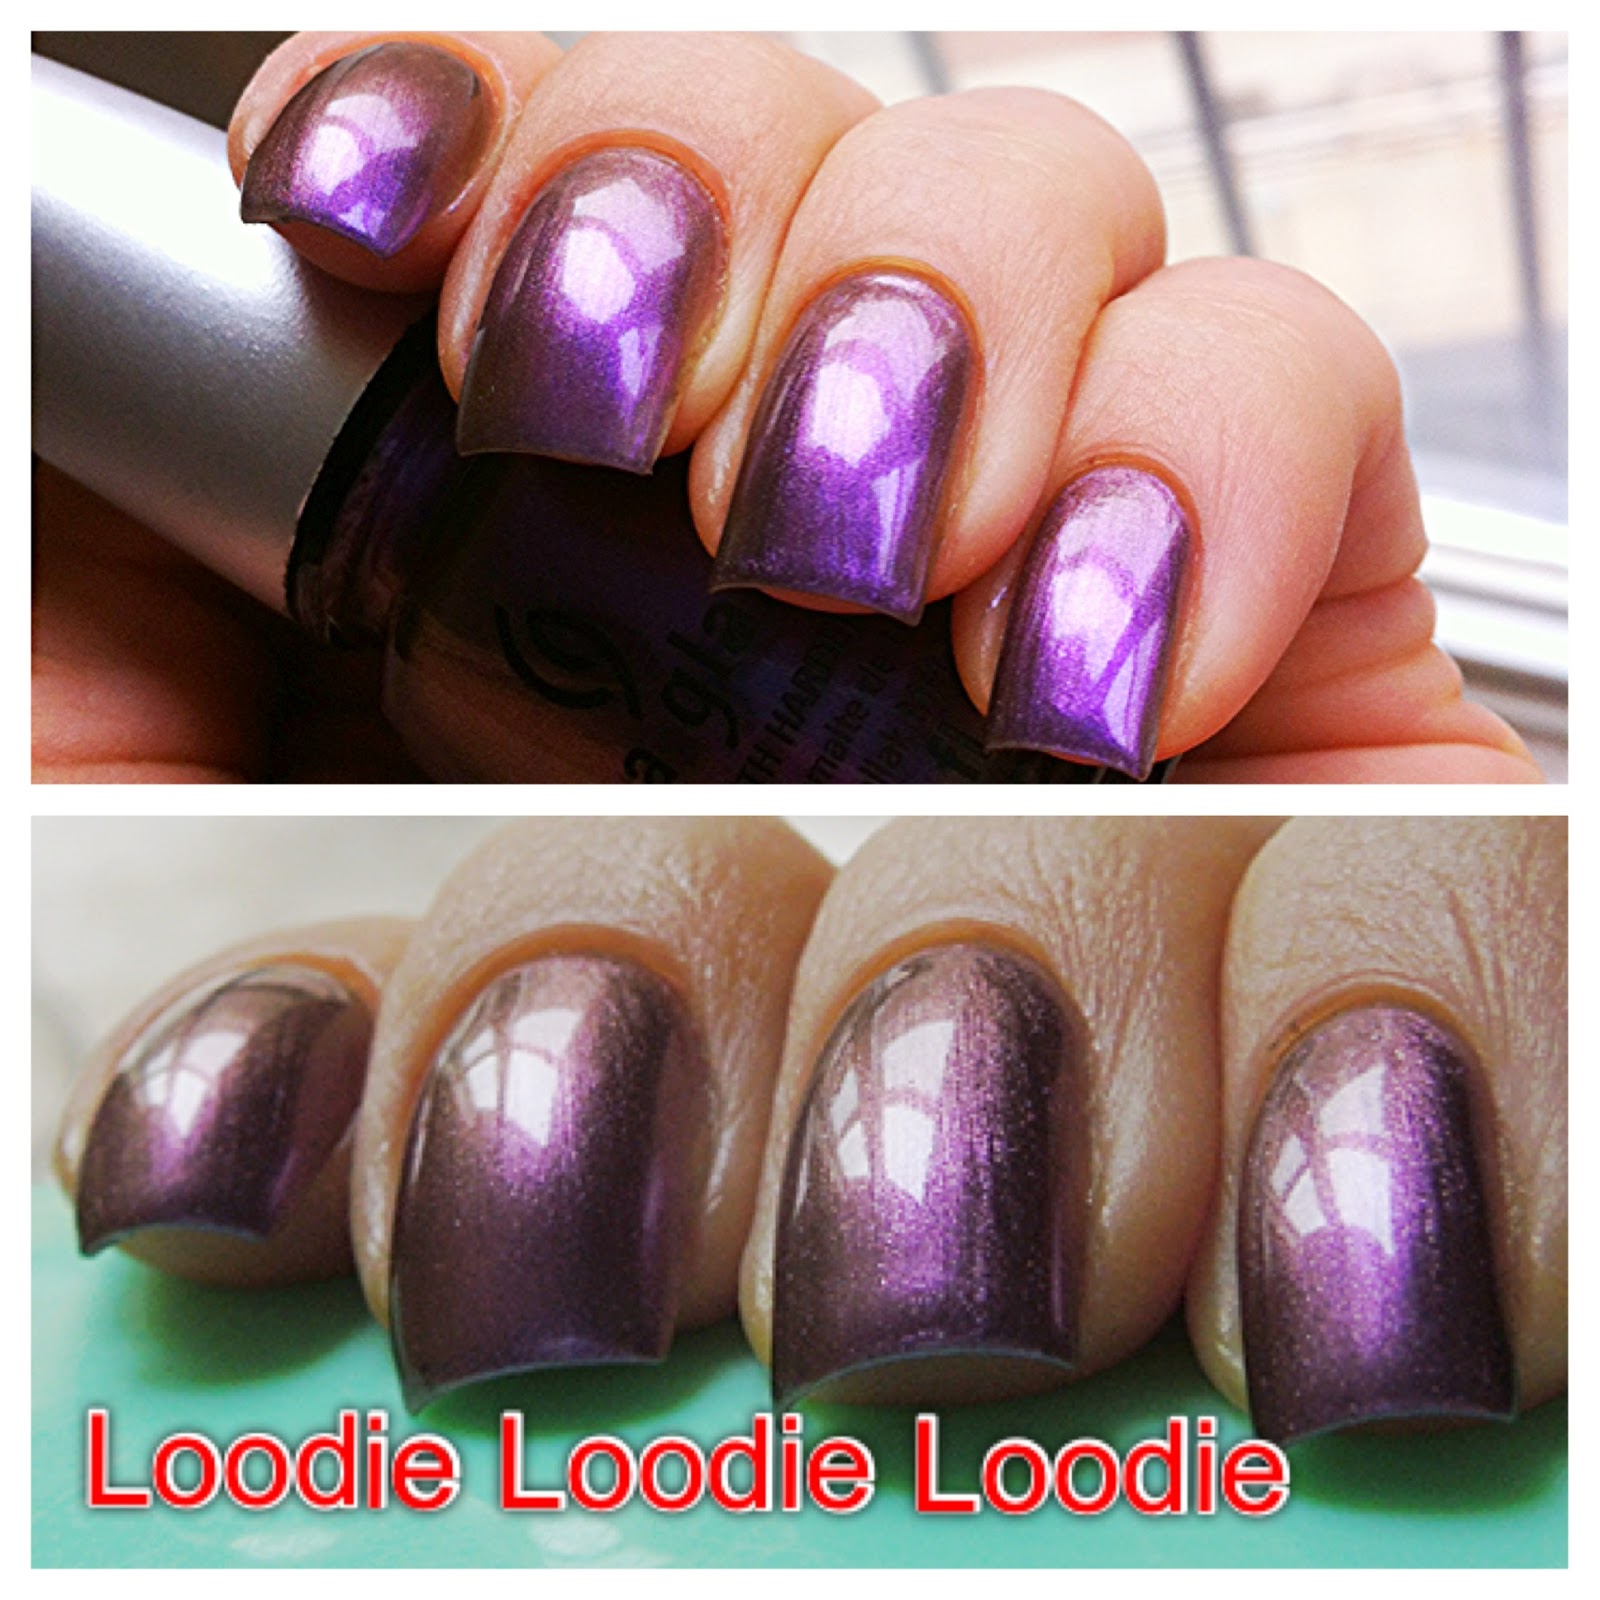
 |
| Milani - Totally Cool over China Glaze - Dorothy Who |
 |
| Milani - Totally Cool over China Glaze - Dorothy Who |
 |
| Zoya - Ivanka |
 |
| Zoya - Ivanka |
 |
| Zoya - Ivanka |
 |
| Models Own - Emerald Black |
 |
| China Glaze - No Plain Jane |
 |
| China Glaze - Want My Bawdy |
 |
| China Glaze - Want My Bawdy |
 |
| China Glaze - Want My Bawdy |
 |
| Ruby Kisses - Hot Pink |
 |
| Essie - Sew Psyched |
 |
| Essie - Sew Psyched |
 |
| Essie - Sew Psyched |
 |
| Revlon - Mon Cherry |
 |
| China Glaze - Thunderbird |
 |
| China Glaze - Thunderbird |
Then I threw Max Factory - Fantasy Fire over it...
 |
| Max Factor - Fantasy Fire |
 |
| China Glaze - Thunderbird |
 |
| China Glaze - Thunderbird with Max Factor - Fantasy Fire |
 |
| China Glaze - Thunderbird with Max Factor - Fantasy Fire |
 |
| China Glaze - Thunderbird with Max Factor - Fantasy Fire |
 | ||
| China Glaze - Thunderbird with Max Factor - Fantasy Fire |
Tuesday, December 4, 2012
Proof is in the pudding
I do love it when readers try things and then send me pictures. It's quite gratifying. I mean, I know the things that spew from this blog work for me, but to have someone else get something out of it is pretty terrific!
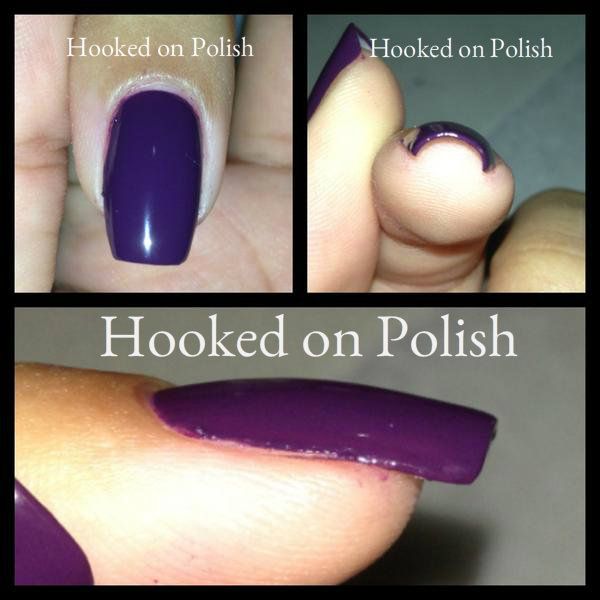
This little lady right here... Kat from Hooked on Polish started chatting me up on Twitter the other month (you can follow her too... click here.) We've been having a hilarious love affair every since. Like me, and many of you, she has to deal with a little wonky nail here and there. After my last post, "Straight and narrow", she showed me her wonk and decided to try the simple filing technique. She was happy with the results and I was ecstatic for her! She was kind enough to let me share her before and after pictures. AND WHO DOESN'T LIKE A GOOD BEFORE AND AFTER. Sorry for shouting, but I really am THAT excited.
Today, I will share with you her results.
Before: photo credit (from twitter)
After: photo credit (from twitter)
It seems silly, but these minor little changes makes a difference when your wonk is getting you down. YAY!
Hugs and kisses to Kat for her testimonial. Thanks for letting me use your pictures! Now, if you will excuse us, we have to go hump. *inappropriate*
WARNING: please read the previous post and all relevant posts linked within and attempt all filing carefully and responsibly as messing with the nail side walls can be tricky.
Good Luck!
This little lady right here... Kat from Hooked on Polish started chatting me up on Twitter the other month (you can follow her too... click here.) We've been having a hilarious love affair every since. Like me, and many of you, she has to deal with a little wonky nail here and there. After my last post, "Straight and narrow", she showed me her wonk and decided to try the simple filing technique. She was happy with the results and I was ecstatic for her! She was kind enough to let me share her before and after pictures. AND WHO DOESN'T LIKE A GOOD BEFORE AND AFTER. Sorry for shouting, but I really am THAT excited.
Today, I will share with you her results.
Before: photo credit (from twitter)
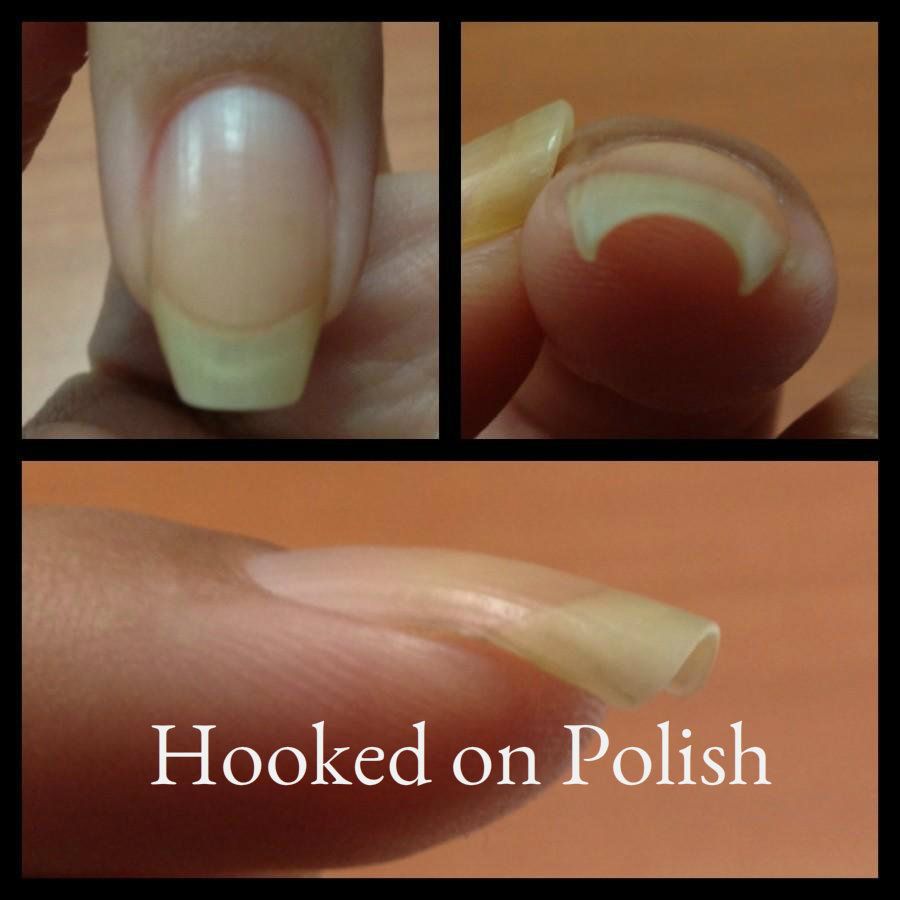 |
| Before |
After: photo credit (from twitter)
 | |
| After |
Hugs and kisses to Kat for her testimonial. Thanks for letting me use your pictures! Now, if you will excuse us, we have to go hump. *inappropriate*
WARNING: please read the previous post and all relevant posts linked within and attempt all filing carefully and responsibly as messing with the nail side walls can be tricky.
Good Luck!
Monday, December 3, 2012
Straight and narrow
How lovely would it be if all of our nails grew evenly and straight?! This is the stuff of dreams! Well, maybe second to winning the lottery. If you weren't blessed (because I sure as hell wasn't), grab your favorite gentle nail file and join me in this tutorial! I recommend either a 220-320 grit strength for strong healthy nails or a 400-600 grit strength (or high quality crystal nail file) for weak problem nails. Here is a nail file post for reference.
I don't know about you, but my nails curve, wonk and do crazy things depending on factors such as water exposure, moisture content and whether they are polished or unpolished. I do pay special attention to filing to make them appear straight and narrow.
At this point, this filing technique is so automatic for me, it's hard to find a before picture. I would have to let my nails grow for quite a while and endure the fatness, crookedness and unevenness. And well, that is REALLY hard. The fact that I know they can look better with a few simple strokes of the file is just too much temptation to not do it all the time.
The look we are going for is very symmetrical. We are going to shoot for even nail beds, paying particular attention to the nail side wall to make it look nice and even...
There are several factors that do not allow my nails to look like this all the time naturally.
First... there is the wonk:
I have discussed how to improve a wonky curvy nail in this post. For me, keeping the nail hydrated and at a length below a certain point makes the wonk improve. One thing I did not mention in that post is how we can also manipulate the nail side walls with filing, to create a more even appearance.
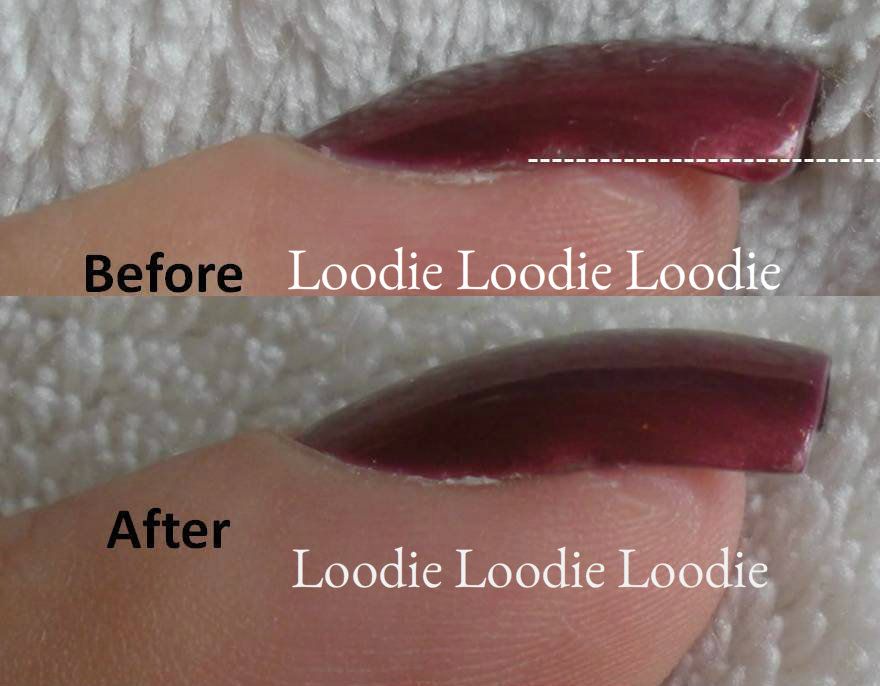
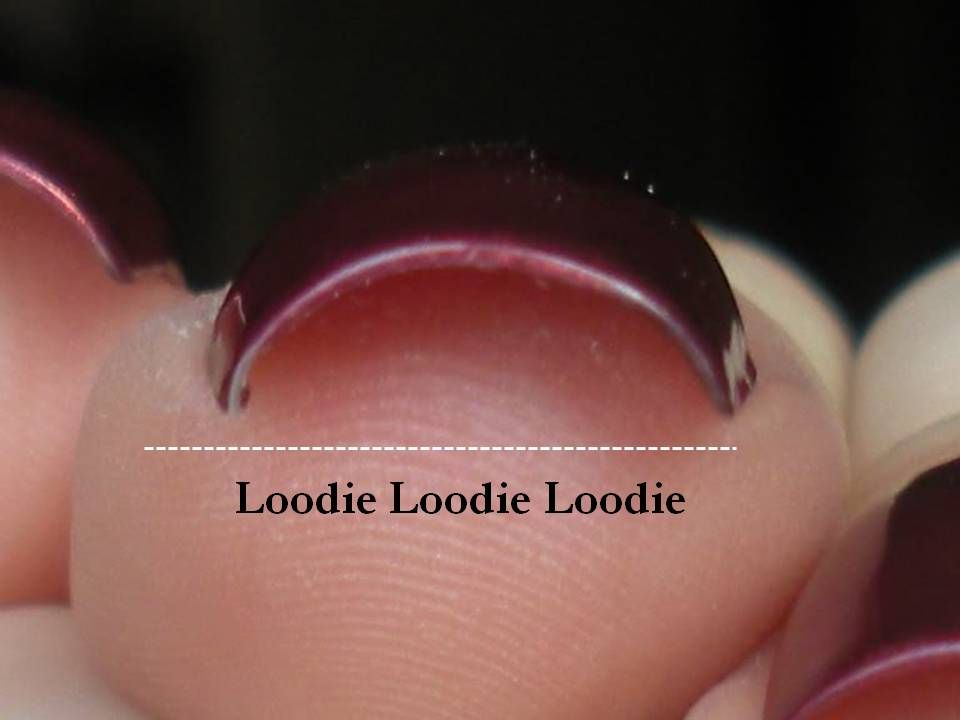
If you take a look at your nail from the side you may see this..
First, notice the curve. Some nails are worse than others. Second, notice the extra overhang at the tip of the nail (free edge) particularly more obvious in the second picture. I can't change that curve shape (my first concern); it is inherent, but I can play with the angles and eliminate the over hang (my second concern). If I file the nail side walls like this...
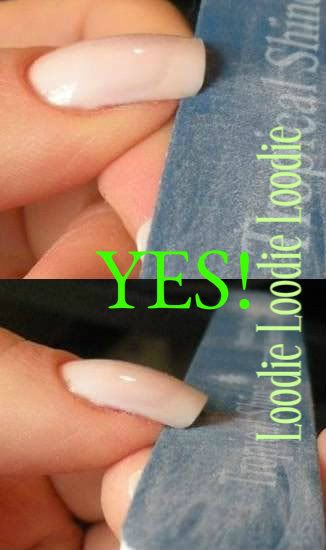 ....suddenly the nail appears flatter and straighter...
 Filing the sides (carefully!) allows me to straighten any imperfections in the c-curve. You may notice your nail c-curve is longer, heavier or curvier on the left vs. the right. Afterwords, my left and right side is not only balanced (I've included a white line that your eye can follow), but some of the c-curve is relaxed a bit. See if you can release/relax your c-curve by filing the sides off a bit. I think this helps trim off some of the weight. Your nail may appear more narrow.
A few small strokes of the nail file allows you to create a much straighter balanced nail. Using a gentle file and the correct technique, I strongly encourage you to play around with your nails to see what kind of shape and balance you can create.
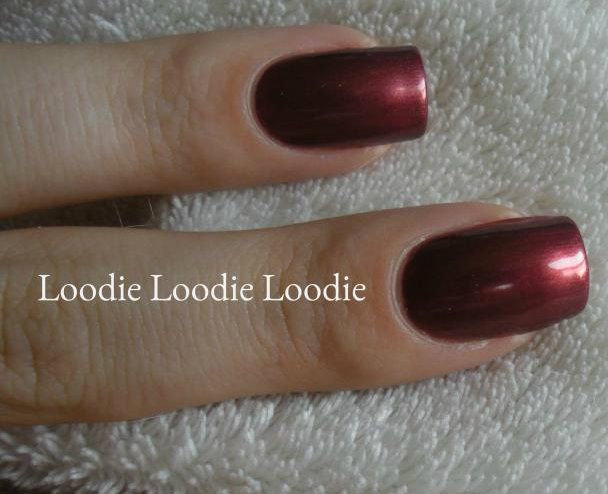
And now for one of my favorite sexy polishes shown above....
*DEAD*
I don't know about you, but my nails curve, wonk and do crazy things depending on factors such as water exposure, moisture content and whether they are polished or unpolished. I do pay special attention to filing to make them appear straight and narrow.
At this point, this filing technique is so automatic for me, it's hard to find a before picture. I would have to let my nails grow for quite a while and endure the fatness, crookedness and unevenness. And well, that is REALLY hard. The fact that I know they can look better with a few simple strokes of the file is just too much temptation to not do it all the time.
The look we are going for is very symmetrical. We are going to shoot for even nail beds, paying particular attention to the nail side wall to make it look nice and even...
 |
| Essie - Licorice |
First... there is the wonk:
 |
| WONK |
I have discussed how to improve a wonky curvy nail in this post. For me, keeping the nail hydrated and at a length below a certain point makes the wonk improve. One thing I did not mention in that post is how we can also manipulate the nail side walls with filing, to create a more even appearance.
If you take a look at your nail from the side you may see this..
 |
| click to enlarge |
 |
| click to enlarge |
First, notice the curve. Some nails are worse than others. Second, notice the extra overhang at the tip of the nail (free edge) particularly more obvious in the second picture. I can't change that curve shape (my first concern); it is inherent, but I can play with the angles and eliminate the over hang (my second concern). If I file the nail side walls like this...
I would advise being very careful while filing the nail side wall. I stressed that point in this and this post. Please read those posts first before attempting... don't fret, there are pictures!
This filing technique is really the key to getting my nails straight. Now, let's look at the c-curve of this nail.
A few small strokes of the nail file allows you to create a much straighter balanced nail. Using a gentle file and the correct technique, I strongly encourage you to play around with your nails to see what kind of shape and balance you can create.
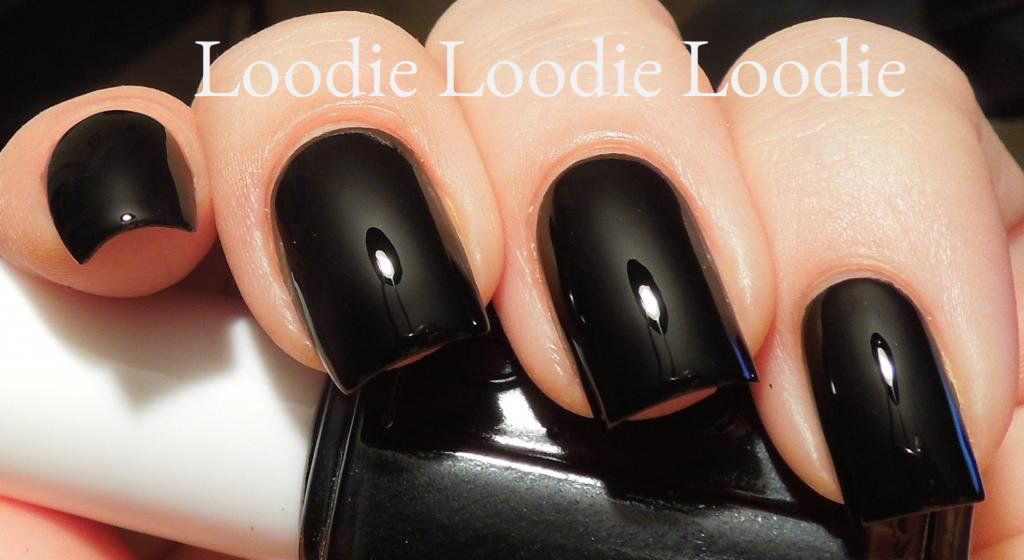
And now for one of my favorite sexy polishes shown above....
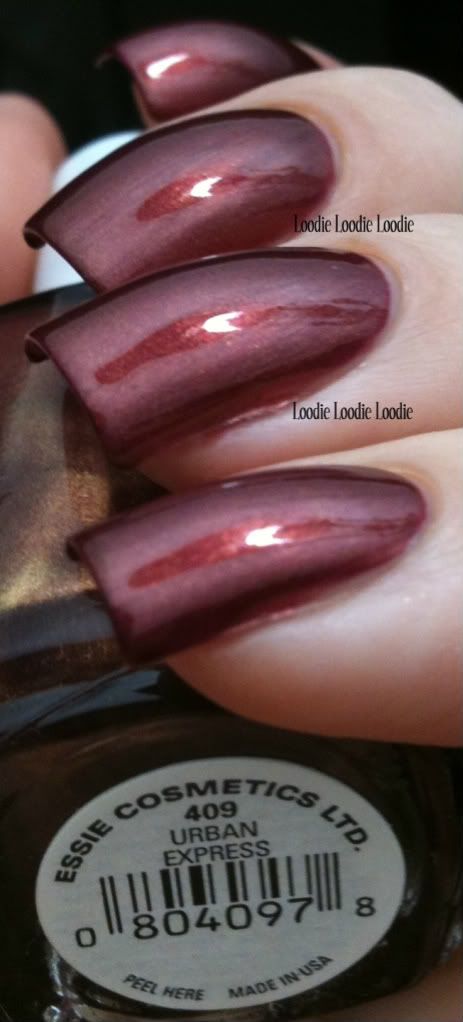 |
| Essie - Urban Express |
*DEAD*
Subscribe to:
Posts (Atom)